忍者ブログ
  • 2026.07
  • 1
  • 2
  • 3
  • 4
  • 5
  • 6
  • 7
  • 8
  • 9
  • 10
  • 11
  • 12
  • 13
  • 14
  • 15
  • 16
  • 17
  • 18
  • 19
  • 20
  • 21
  • 22
  • 23
  • 24
  • 25
  • 26
  • 27
  • 28
  • 29
  • 30
  • 31
  • 2026.09
[PR]
×

[PR]上記の広告は3ヶ月以上新規記事投稿のないブログに表示されています。新しい記事を書く事で広告が消えます。

【2026/08/20 22:49 】 |
エクセルをPDFに変換したい

Excel→PDF変換するためのツールがEcPDF2007.exeです。
ダウンロードはこのサイトからできます。
http://online-de.from.tv/dll/dwnlist.html

Excelはバージョン2007です

--------
 概要
--------
VB.NET 用 コンポーネント
ExcelをPDFに変換するアプリケーションです。
------------
 動作環境
------------
VB.NETのクラスライブラリが利用可能な環境
Excelは2007以降が必要です(重要:2007より前のバージョンは対応していません)。
----------------
 インストール
----------------
setup.exeを起動します、「次へ」で自動インストール作業が進んでいきます。
--------------------
 アンインストール
--------------------
コントロールパネルよりEcPDF2007を削除してください。

【使用方法】画面から操作
一個目のテキストボックスにエクセルファイルのフルパスを設定
二個目のテキストボックスにPDFのフルパスを設定
実行ボタンを押します。

【使用方法】コマンドプロンプトから操作
引数1→エクセルファイル名フルパス
引数2→PDF名フルパス
例)
C:\> EcPDF2007.exe "C:\Users\x300\Book1.xlsx" "C:\Users\x300\PdfTest.pdf"
 

PR
【2010/06/01 13:09 】 | 未選択 | 有り難いご意見(0) | トラックバック()
VisualBasic.NET PDF作成方法


【PDF】PDF作成コンポーネント(PdfWriterLib.dll)をダウンロードし自作する方法
こちらからPdfWriteLib.dllをダウンロードします。
http://online-de.from.tv/dll/index.html

【コードサンプル】
    Private Sub Button1_Click(ByVal sender As System.Object, ByVal e As System.EventArgs) Handles Button27.Click
        '==================
        '文字列表示
        '==================
        Me.Pdf1.PdfSetBodyData(PdfWriterLib.BodyType.Text, "データ001")
        '==================
        'ヘッダー作成
        '==================
        Me.Pdf1.PdfSetHeader("ヘッダーです")
        '==================
        'フッター作成
        '==================
        Me.Pdf1.PdfSetFooter("フッターです")
        '==================
        '表(テーブル)作成
        '==================
        Dim dt As DataTable
        dt = GetTable()
        Me.Pdf1.PdfSetBodyData(PdfWriterLib.BodyType.Talbe, dt)
        '==================
        '画像張り付け
        '==================
        Me.Pdf1.PdfSetBodyData(PdfWriterLib.BodyType.Image, "C:\Users\x300\Dock.jpg")
        '==================
        '出力
        '==================
        Me.Pdf1.PdfCreate("pdf.pdf")
    End Sub

    ''' <summary>
    ''' 表データ作成(サンプル用)
    ''' </summary>
    ''' <returns></returns>
    ''' <remarks></remarks>
    Public Function GetTable() As DataTable
        Dim dt As DataTable
        dt = New DataTable
        dt.Columns.Add("Field1")
        dt.Columns.Add("Field2")
        Dim R As DataRow
        R = dt.NewRow()
        R.Item(0) = "123"
        R.Item(1) = "234"
        dt.Rows.Add(R)
        Return dt
    End Function
 

【2010/06/01 08:10 】 | 未選択 | 有り難いご意見(0) | トラックバック()
エクセルをPDFで出力するには


まず仮想プリンタをインストールします。
以下の4つの仮想プリンタから好きなものを選択してください。
機能は多少違いますがPDF作成は可能です。
■PDFCreator
http://www.pdfforge.org/pdfcreator
PDFCreator
■Bullzip PDF Printer
http://www.bullzip.com/download.php
■Primo PDF
http://www.xlsoft.com/jp/products/primopdf/index.html
PrimoPDF
■CutePDF
http://www.cutepdf.com/

●基本的な動作
プリンタを一時的にPDFプリンタ(仮想プリンタ)に設定、
印刷処理を行う→PDFが出力される
出力後元のプリンタ設定に戻す
'■■■■■■■■■■■■■■■■■■■■■■■■■■
'【Excel操作の設定】
'[プロジェクト]→[参照の追加]→
'→[COM]タブ→[Microsoft Excel *.* ObjectLibrary] (*.*は実際は数値になっています)
' を参照設定する必要があります。
'■■■■■■■■■■■■■■■■■■■■■■■■■■
Imports Microsoft.Office.Interop
Imports Microsoft.Office.Core
'----------------------------------------------
Dim xlApp As Excel.Application
xlApp = New Excel.Application()
xlApp.DisplayAlerts = False
xlApp.Visible = True

Dim xlBooks As Excel.Workbooks = xlApp.Workbooks
Dim xlBook As Excel.Workbook = xlBooks.Open("C:\変換元のエクセル.xls")
Dim xlSheets As Excel.Sheets = xlBook.Sheets
Dim xlSheet As Excel.Worksheet = DirectCast(xlSheets(1), Excel.Worksheet)
xlSheet.PrintOut(ActivePrinter:="ココに上記のプリンタ名")
If Not xlSheet Is Nothing Then
    System.Runtime.InteropServices.Marshal.ReleaseComObject(xlSheet)
End If

If Not xlBook Is Nothing Then
    Try
      xlBook.Close()
    Finally
      System.Runtime.InteropServices.Marshal.ReleaseComObject(xlBook)
    End Try
End If

If Not xlApp Is Nothing Then
    Try
      xlApp.Quit()
    Finally
      System.Runtime.InteropServices.Marshal.ReleaseComObject(xlApp)
    End Try
End If

【2010/06/01 07:29 】 | 未選択 | 有り難いご意見(0) | トラックバック()
ProgressBar(プログレスバー)にグラデーションをかける方法


グラデーション表示可能なコンポーネントが公開されていましたので、

ご紹介しておきますね。まずコンポーネントExControlsLibをダウンロードしてください。
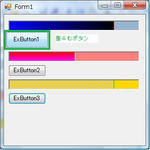
ExControlsLib.jpg


【ソースコード】例
Public Class Form1
    Private Sub ExButton1_Click(ByVal sender As System.Object, ByVal e As System.EventArgs) Handles ExButton1.Click
        Me.ExProgressBar1.Value += 10
    End Sub

    Private Sub ExButton2_Click(ByVal sender As System.Object, ByVal e As System.EventArgs) Handles ExButton2.Click
        Me.ExProgressBar2.Value += 10
    End Sub

    Private Sub ExButton3_Click(ByVal sender As System.Object, ByVal e As System.EventArgs) Handles ExButton3.Click
        Me.ExProgressBar3.Value += 10
    End Sub

    Private Sub Form1_Load(ByVal sender As System.Object, ByVal e As System.EventArgs) Handles MyBase.Load
        '=========================================
        'グラデーション(プロパティ設定)
        '=========================================
        Me.ExProgressBar1.BackColorEx = Color.Beige
        Me.ExProgressBar1.FillBorderColorEx = Color.White
        Me.ExProgressBar1.FillColorEx = Color.Black
        Me.ExProgressBar1.FillGradientColorEx = Color.Blue
        Me.ExProgressBar1.FillGradientStyleEx = PowerPacks.FillGradientStyle.Horizontal
        Me.ExProgressBar1.FillStyleEx = PowerPacks.FillStyle.Solid
        '=========================================
        'シマシマ(プロパティ設定)
        '=========================================
        Me.ExProgressBar2.BackColorEx = Color.Gray
        Me.ExProgressBar2.FillBorderColorEx = Color.White
        Me.ExProgressBar2.FillColorEx = Color.Red
        Me.ExProgressBar2.FillGradientColorEx = Color.Blue
        Me.ExProgressBar2.FillGradientStyleEx = PowerPacks.FillGradientStyle.Horizontal
        Me.ExProgressBar2.FillStyleEx = PowerPacks.FillStyle.SmallGrid
        '=========================================
        'グラデーション:タテ(プロパティ設定)
        '=========================================
        Me.ExProgressBar3.BackColorEx = Color.White
        Me.ExProgressBar3.FillBorderColorEx = Color.White
        Me.ExProgressBar3.FillColorEx = Color.Black
        Me.ExProgressBar3.FillGradientColorEx = Color.Blue
        Me.ExProgressBar3.FillGradientStyleEx = PowerPacks.FillGradientStyle.Vertical
        Me.ExProgressBar3.FillStyleEx = PowerPacks.FillStyle.Solid
    End Sub
End Class
 

【2010/05/31 16:09 】 | 未選択 | 有り難いご意見(0) | トラックバック()
postgreSQL-ODBCを64bitパソコンで設定する方法

postgreSQL-ODBCの64ビット設定方法を以下に


1、64ビット用ODBCドライバをダウンロードします。

2、64ビットマシンには32ビット用ODBC設定画面があるので、
  そこからODBCの設定を行います。

3、データソースの設定を32ビットパソコンと同じになるようにします。

以上で64ビットパソコンでもODBC接続が可能になります。
 

【2010/05/30 14:39 】 | 未選択 | 有り難いご意見(0) | トラックバック()
<<前ページ | ホーム |
